Temperature deviations are one of the main contributors to measurement uncertainty when using coordinate measuring machines. The machine and workpiece temperature directly influence the measurement result. In addition to the temporal and spatial temperature gradients, influencing factors include the residual heat of the workpiece (e.g. from machining and handling) and heat sources in the measuring machine (e.g. motors, light sources). motors, light sources).
The primary thermally induced sources of measurement uncertainty are the linear expansion of the workpiece and the measuring systems installed in the measuring machine with increasing temperatures. Other thermally induced measurement errors are caused by the deformation of the measuring machine and the change in length of the stylus during tactile measurements. These effects are not corrected in most machines. The size of the measurement error varies depending on the thermal expansion coefficient of the workpiece material. Temperature compensation of the measurement results is only unnecessary if the reference temperature is maintained throughout the measurement. This means a constant temperature of 20 °C for both the entire coordinate measuring machine (CMM) and the workpiece.
Thermally induced change in length
The greater the coefficient of thermal expansion α of the material, the length L0 of the workpiece and the temperature deviation ΔT from the reference temperature, the greater the thermally induced length deviation ΔL:
ΔL = α - L₀ - ΔT
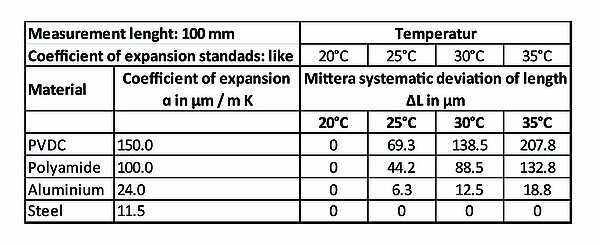
Without temperature compensation, for example, the length measurement of a 100 mm long PVDC workpiece at 25 °C and measuring systems mounted on steel rails results in a measurement error of approx. 70 µm.
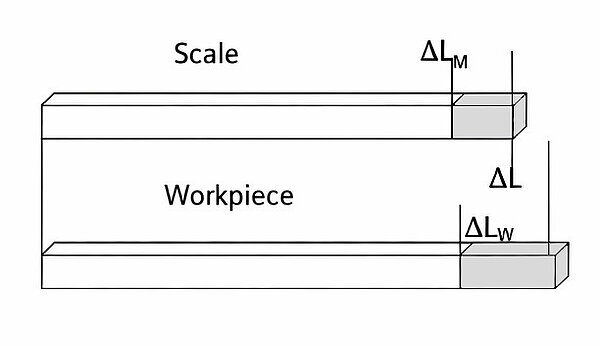
As the temperature increases, the workpiece expands and the measurement error increases. As the measuring systems also expand, the measurement error is partially compensated (image 1). Therefore, in the above example, the change in length of the measuring systems was subtracted from that of the workpiece.
If workpieces are measured with measuring systems made of identical materials, the expansion effects are compensated for as long as the same temperature conditions prevail at the measuring system and workpiece. However, this method has two disadvantages: Firstly, it is rather rare in practice for the temperatures of the measurement systems and workpiece to match exactly, and secondly, only workpieces that have the same coefficient of thermal expansion α as the measurement systems can be measured in this way.
There are measuring systems made of special ceramics that have a coefficient of thermal expansion close to zero, so that only the expansion of the workpiece needs to be taken into account. However, this alone is not an optimal solution for compensating for thermally induced measurement errors.
This is because without mathematical temperature compensation, the error due to the expansion of the workpiece will increase if the measuring systems do not also expand. The mathematical correction of the thermal influence is absolutely necessary here if it cannot be ensured that the workpieces are measured exactly at 20 °C.
Specification for real environmental conditions
For each coordinate measuring machine, the manufacturer specifies a maximum permissible length measurement error under defined environmental conditions. These conditions also include the temperature interval in which the machine operates within the specifications given. The specifications usually apply to temperature deviations of ± 2 K from the reference temperature of 20 °C in the laboratory. Some manufacturers guarantee a higher performance of the measuring machine for more rigid temperature conditions by specifying a lower maximum permissible length measurement error of only ± 1 K for temperature fluctuations, for example.
Specifications for operating the machine in a non-air-conditioned environment, for example for measurements close to production, are only offered by a few manufacturers. Here, the specified maximum permissible length measurement error should be valid for a temperature interval between 16 °C and 30 °C as a minimum. It should be noted that this specification is not restricted by the manufacturer to standard parts with a coefficient of expansion = 0. Such a specification would be of little practical use, as hardly anyone measures workpieces with this property.
Temperature sensors on the measuring systems are standard equipment for all Werth coordinate measuring machines. The linear expansion is mathematically corrected using the thermal expansion coefficient of the measuring systems.


